Monday, March 30, 2009

Healthy Steak and Kidney Pie with Garlic Mash Recipe


Steak and Kidney Pie with Garlic Mash

or two people, you will require:

1lb (450g) of steak (diced)
1lb (450g) of ox kidneys (cleaned and diced)
1 small onion (halved then sliced)
1 pint (550ml) of fresh beef stock (a recipe can be found further down this page)
1/2 pint (275ml) of full bodied red wine
1 tbsp of plain flour
1/2 tsp of dried thyme
1/2lb (225g) of puff pastry
1 small egg for glazing (beaten)
1lb (450g) of potatoes (peeled and chunked)
Handful of flat leafed parsley (roughly chopped)
2 garlic cloves (crushed)
2 tbsp of frozen peas
Olive oil
Freshly ground black pepper

Put the flour in to a large bowl and season well with pepper. Add the beef and the kidney and mix well, ensuring each piece is coated. In a large, non-stick pan, put a drizzle of olive oil, bring up to a heat and brown the meat, adding the onion for the last minute. Pour in the stock and wine and add the thyme. Bring up to a simmer and continue to simmer for 1 1/2 to 2 hours, stirring occasionally, until the stock is lush and thick and the meat tender. A "skin" may form and re-form on the top which is simply impurities from the kidneys and should be carefully skimmed off and discarded.

Put your oven on to preheat to 200 degrees centigrade or equivalent then roll out the pastry on a floured board until it is big enough to cover a ten inch (25cm) long, rectangular pie dish. Spoon the meat in to the dish and lightly grease the edges with some butter. Put the pastry on top, crimp down the edges and trim it to size with a knife. Glaze with the beaten egg then cut a small cross in the centre of the pastry to allow the steam to escape. Place in to the oven for half an hour.

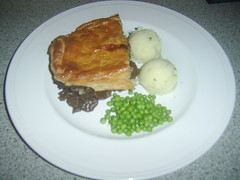
Put the potatoes on to boil in lightly salted water for about twenty-five minutes. Mash them and add the parsley and crushed garlic, ensuring to stir them through well. Cook the peas for two to three minutes in boiling water dependant upon the instructions on the packet and plate up what is an outstandingly delicious meal.

apple cake recipe


I had half a dozen apples in the fridge. The recipe was very simple, used only one egg, so easy to substitute the egg. The cake came out very well. It was very moist and fluffy, but over the top sweet. The original recipe used 1 cup sugar and the apples I used were sweet too, so the cake became very sweet. So I have changed the recipe to 3/4 cup of sugar. I was wondering what to do with the cake, then got this (wonderful) idea. I was not sure whether it would work, but I was totally surprised and happy with the result. Check the My Notes section to see what I did. But this apple cake recipe is definitely a keeper for its easy prep and unbelievably moist and fluffy texture for a vegan cake.
Integration
Butter, softened (I used Earth Balance - 4 tbspns) 3 tablespoons
Sugar 3/4 cup
Ener-G (in place of 1 egg) 1 and 1/2 teaspoons
Water 2 tablespoons
Soy Milk (if using Ener-G) 3 tablespoons
Vanilla Extract 1 teaspoon
All Purpose Flour (I used whole wheat pastry flour) 1 cup
Baking Soda 1 teaspoon
Salt 1/4 teaspoon
Ground Cinnamon (I used 1/4 teaspoon) 1/2 teaspoon
Ground Nutmeg (I did not use) 1/2 teaspoon
Apples, peeled and diced (I grated it) 3 cups
Nuts, chopped (I used 1/2 cup walnuts) 1/4 cup
Whipped cream/Ice cream optiona

Saturday, March 28, 2009

Fairy Tale Princess Cake

Fairy Tale Princess Cake
Delight your princess with a magical cake that's made foolproof with an easy cake mix and purchased frosting.
Prep Time: 40 min
Total Time: 3 hours 40 min
Makes: 30 servings
2boxes Betty Crocker® SuperMoist® yellow cake mix
Water, vegetable oil and eggs called for on cake mix boxes
2containers (1 lb each) Betty Crocker® Rich & Creamy vanilla frosting
Red food color
1fashion doll (11 1/2 inches tall)
1/4cup Betty Crocker® star-shaped candy decors
1.Heat oven to 325°F. Grease 1 (1 1/2-quart) ovenproof bowl (8 inches across top) and 2 (8-inch) round cake pans with shortening; coat with flour (do not use cooking spray).*
2.In large bowl, make both cake mixes as directed on box, using water, oil and eggs for each mix. (Two boxes of cake mix can be made at one time; do not make more than 2 boxes, and do not increase beating time.) Pour 3 1/2 cups batter into 1 1/2-quart bowl and 2 1/2 cups batter into each cake pan.
3.Bake cake pans 35 to 40 minutes and bowl 45 to 50 minutes or until toothpick inserted in center comes out clean. Cool 10 minutes. Remove cakes from pans and bowl; place rounded sides up on cooling racks. Cool completely, about 1 hour. If necessary, cut off rounded tops of cakes baked in 8-inch pans. Cut 2-inch-diameter hole in center of all 3 cakes.
4.Spoon frosting into large bowl. Stir in enough food color until desired pink color. Place one 8-inch cake on serving plate; spread 1/3 cup frosting over top. Top with second 8-inch cake; spread with 1/3 cup frosting. Top with bowl cake.
5.Wrap hair and lower half of doll with plastic wrap. Insert doll into center of cake. Trim side of cake if necessary to make a tapered "skirt."
6.To "crumb-coat" cake, spread thin layer of frosting over side and top of layered cake to seal in crumbs. Freeze cake 30 to 60 minutes.
7.Fit #24 star tip into decorating bag. Spoon 1/4 cup pink frosting into decorating bag; set aside. Starting at waist of doll, frost cake with downward strokes to make ruffled skirt. Use star tip to cover bodice of doll and add decoration to skirt if desired. Gently press star decors into frosting to decorate neckline and skirt. Unwrap hair.
*As shown in How-To Video, cake can be baked in 3 (8-inch) round cake pans and 1 (1 1/2-quart) bowl. Use 3 1/2 cups batter in bowl and 1 2/3 cups batter in each cake pan. Bake cake pans 30 to 35 minutes and bowl 45 to 50 minutes. 

High Altitude (3500-6500 ft): Bake 1 1/2-quart bowl 50 to 55 minutes

Hat Cake

Hat Cake
Parade this cake at a special occasion! Birthdays, teas or a hats-off-to-you celebration!
Prep Time: 30 min
Total Time: 2 hours 18 min
Makes: 16 serving

Containts

1box Betty Crocker® SuperMoist® cake mix (any flavor)
Water, vegetable oil and eggs called for on cake mix box
2containers Betty Crocker® Rich & Creamy or Whipped frosting (any flavor)
Ribbon and edible flowers (dianthus, pansies, violas)

Preperation


1.Heat oven to 350°F (325°F for dark or nonstick pan). Bake and cool cake as directed on box--except use one 8-inch round pan and one 9-inch round pan.
2.Cut 6-inch circle out of waxed paper; place on 8-inch layer. Cut cake around circle with small knife to make 6-inch round layer; place on 9-inch layer, attaching pieces with small amount of frosting.
3.Frost cake. Trim hat with ribbon and flowers. Store loosely covered in refrigerator.
High Altitude (3500-6500 ft): Follow High Altitude cake mix directions for 8-inch and 9-inch pans.

How-to make a diaper cake

The amazing baby shower diaper cake

While making a diaper cake may seem simple when just looking at the finished product in a picture or at the baby shower, it can be a big pain when you don't know all the tricks and tips.  Even some of the online free instructions will unintentionally leave out steps that could stop you dead in your tracks.  Remember that sometimes 'free' isn't always helpful.
Example Diaper Cake Recipe 
When you purchase instructions you'll normally get at least a few example recipe's to work with. This can make shopping for the ingredients as easy as possible. An example recipe would be like the following:
  • 60 Cloth or disposable diapers - check with the mother for her preference. Plan white or patterned can be used.
  • Ribbon, 1/2 or 1 inch wide, to match the baby shower theme. Pink, blue, or yellow are always good choices.
  • Ribbon, 1/4 inch to tie rolled diapers up
  • 36-60 small rubber bands for helping to work with the diapers
  • 6 large rubber bands
  • One 8-oz baby bottle or one large bottle of baby lotion
  • One 4-oz baby bottle
  • A cardboard or plastic cake platter
  • Cake decorations like baby confetti, baby sock roses, artificial roses, etc.
  • Baby items - Pacifiers, bottles, lotion, bibs, receiving blankets, miniature stuffed animals, baby towel, onesie, wash cloths, baby hygiene products, toys, etc.

Avoid spending extra time and money experimenting while you figure out the best way to make your diaper cake.  Get some inexpensive help!  Buy a book or even some online video's to help streamline your learning and create a more polished end product the first time.  This minor investment can cut hours off your cake building time by having the right information at your fingertips.

Giving a diaper cake as a baby shower gift makes a big splash because it's delightful look at, drawing all eyes at your baby shower. Plus, your diaper cake will last long after the shower till baby is born and beyond.

Think of how much pleasure mom-to-be will be getting, in the weeks and months ahead. The diaper cake transforms, from being a thing of beauty to something very practical, too. So your diaper cake is a gift that keeps on giving and giving.

To make your baby shower diaper cake; open a diaper then roll it up. Open another diaper then wrap your next diaper around the first one. Keep going rolling and rolling the diapers making even layers. Secure the finished cake with tape and curling ribbon.

For a finishing touch; next start decorating the cake with baby goodies like pacifiers, plush toys and the like. And remember to have fun making your baby shower diaper cake

Roll up other small gifts in between the diapers if you feel inspired.

And remember to have fun making your baby shower diaper cake.

Kids Birthday Party Themes-Cake & Cupcake Pictures, Ideas

GIRLS THEAM BIRTHDAY CAKE
Princess, Disney Princess, Tea Party, Dress-Up, Bratz, Little Pony, Strawberry Shortcake, Care Bears, Hello Kitty, and Barbie

featured lensfeatured lensfeatured lens

fire truck cake     princess cakeprincess doll cakeprincess castle cake
kids birthday cakes purse cakepurse cakesmonkey cake


hat caketea pot cakepurse cake/

BOYS THEAM BIRTHDAY CAKE
irates, Dinosaurs, Trucks, Bob the Builder, Cars, Star Wars, Scooby Doo, SpongeBob SquarePants, Trains, Thomas the Tank Engine, and Construction


racetrack cake /racing birthday cakelightening mcqueen cakeracecar cake
racecar birthday caket  nascar cakescooby doo birthday cakelittle hero cake
fire truck birthday cakefire truck birthday cake  fire truck cakemonster truck cake

CUP CAKES
blues clues cake recipeblues clues paw print cakeblues clues cupcakesblues clues birthday cake
blues clues cake design


Cake Decorating - A Few Cake Decorating Ideas

doll cake barbie doll cake treasure chest cakedid you know that the first cakes baked in America where small loaves of sweet bread? Look how far we have come. Home bakers should not be intimidated by the elaborate cakes being made today. You do not need to be a pastry chef to make beautiful cakes, you just need the know-how and practice. Of course the right tools will go a long way in your cake decorating endeavors. Here are a few ideas you might like to try.

Every cake worth merit starts with a smooth icing. The cake needs to cool completely before they are iced and decorated. To keep crumbs from ending up in your icing and ruining the look of your cake, start with a thin base coat of frosting that is not quite as stiff as the regular layer will be. Once this coat is on, set the cake in the refrigerator for 20 minutes. This will set the icing and any crumbs will be caught in this first layer. Now you can spread a regular layer of icing without worrying about crumbs.

Use an icing spatula to apply and smooth the second coat of icing. Once the icing is on the cake, start smoothing on the sides by running the spatula around the perimeter of the cake. One trick for smoothing the frosting is to dip the metal icing spatula in cold water, this will aid in smoothing the frosting. To smooth the top, dip the spatula in cold water and holding it horizontally over the top of the cake. Start at the point farthest from you, holding the spatula in both hands, skim the top of the icing by bringing the spatula straight toward you.

Simple Designs

Some cake decorators say learning to smooth the icing is the hardest part of cake decorating. Practice will make you a pro in not time. Once you have it down, show it off, even a cake without many decorations that is clean and smooth will make an perfectly elegant offering.

Instead of icing, cake tops can be dusted with powdered sugar. You can choose to use a stencil for a more decorated appearance, or just the powdered sugar for a clean look.

Edible decorations are a beautiful yet simple cake decorating technique. The use of sprinkles, candy, nuts, and coconut pressed into the icing before it sets, will make your cake stand out.

To apply a textured look for your cake decorating, use a small cardboard comb, available in baking supply stores.

Piping is achieved by using a pastry bag fitted with a metal tip that is held on by a coupler. This is your most important tool for cake decorating. You can make lines, words, shells, flowers, and many other designs on the top or sides of the cake. Fill the bag with no more than 1 cup of icing at a time, twist the top of the bag and keep steady pressure when piping the design. Use your other hand to guide the tip. It is wise to find out everything you can about piping before you begin.

Fondant a smooth white paste, is used in complicated cake decorating. Fondant is kneaded and rolled to cover cakes with a sleek smooth layer of icing. It is also used to make designs that are 3-D. It is less tasty than buttercream, but the cake will look sleek and elegant.

Thursday, March 26, 2009

DUM KOBI

gobi dum Dum Gobi
Cauliflower in Gram Flour Sauce

Ingredients:

Cauliflower 1
Besan / Gram Flour 3 tbsps
Onion 1
Ginger 1 inch piece
Green Chiles 2
Garam Masala 1 tsp
Red Chile Powder 1 tsp
Cumin Seeds 1 tsp
Yogurt 1 cup
Cashews 3
Turmeric Powder a big pinch
Lemon Juice 1 tbsp
Oil 1 tbsp
Salt to taste

Method of preparation:

Remove hard stem, break cauliflower into big florets and wash them under water thoroughly.
Peel and finely chop onion.
Remove stems, wash and slice the green chiles.
Peel and mince ginger.
Chop cashew nuts into small bits.

Bring to boil 2 cups of water, add cauliflower florets, lemon juice, turmeric powder and salt.
Boil for 2 - 4 minutes or until cauliflower becomes soft but not mushy.
Strain the cooked cauliflower and reserve for later use.

Heat oil in a non stick pan on medium flame, add cumin seeds and onion.
Once onion turns translucent, add green chiles, ginger and besan.
Fry until besan changes to golden brown or until the raw smell of besan has gone.
Stir in yogurt, red chile powder, garam masala powder and salt.
Add half a cup of water to besan mixture if the sauce seems too thick.
Boil and remove from heat.

In a baking bowl, add cooked cauliflower florets.
Pour the besan sauce on top of the cauliflower florets and cover.
Bake the dish for 5 minutes and garnish with chopped cashews.
Serve dum gobi with steamed rice or roti.

Notes: Alternatively, fry the boiled cauliflower florets in little bit of oil before pouring the sauce.

Amaranth Leaves Wada


thotakura garelu Amaranth Leaves Wada
Thotakura Garelu

Ingredients:

Amaranth Leaves 2 cups packed
Urad dal 1 cup
Green Chillies 2
Ginger 1 inch piece
Cumin seeds 1 tsp
Salt to taste
Oil for deep frying

Method of preparation:

Soak urad dal in water for two hours.
Grind the soaked urad dal into thick smooth paste adding minimum amount of water.

Wash thoroughly and finely chop amaranth leaves.
Remove stems, wash and finely chop green chiles.
Peel and mince ginger.

In a mixing bowl, mix ground urad dal paste, chopped amaranth leaves, green chiles, ginger, cumin seeds and salt.

In a deep frying pan, heat oil on medium high.
Wash left palm and let it be wet all through the process.
Using right hand, make lemon sized ball with urad dal mixture.
Place in on left palm and flatten it.
Make a small hole in the middle, remove from left palm and slowly leave in hot oil.
Fry on both sides until golden brown.
Repeat the same with remaining urad dal amaranth mixture.
Serve amaranth leaves wada hot with coconut chutney and sambar.

Notes: Storing the ground urad dal mixture in refrigerator and using it the next day soaks more oil. So use immediately.

Deep Fried Chana Dal

chana fried Deep Fried Chana Dal
Vepudu Senaga Pappu

Ingredients:

Chana Dal 1 cup
Red Chilli Powder to taste
Salt to taste
Oil for deep frying

Method of preparation:

Soak chana dal in water for 3 - 4 hours.
Place the soaked chana dal on kitchen towel and pat it dry.

Heat oil in a deep frying pan on medium high heat.
Slowly drop soaked chana dal into hot oil.
After few minutes, oil stops bubbling.
Stir and fry the chana dal for one more minute.
Remove the completely roasted chana dal onto absorbent paper.
Pour the fried chana dal into a jar while its still hot, sprinkle sufficient red chilli powder and salt.
Mix thoroughly, let it cool and serve fried chana dal as a snack.

Notes: Add a small pinch of soda bi carb in soaked chana dal if you wish

Monday, March 23, 2009

Indian Vegetarian Moong Dal Kichari Recipe


Rice and Moong Dal Kichari with Cauliflower and peas

Preparation time (after assembling ingredients): 5 minutes
Serves: 4 to 6

1 cup basmati rice
1 small cauliflower, washed, dried and cut into flowerets
1 pinch of hing (asafotida)
4 tablespoons ghee or vegetable oil
1/2 tablespoon shredded fresh ginger root
1 tablespoon minced seeded hot chilies (or as desired)
1 tablespoon cumin seeds
2/3 cup split moong dal (or split peas)
3/4 cup fresh green peas
7 cups water
2 1/2 teaspoons salt
1 tablespoon ghee

1. Clean, wash, soak and drain rice and dal.

2. Have the cauliflower and hing ready next to the stove. Heat 4 tablespoons of ghee in a 4-5 quart saucepan over high heat. When it is hot, stir in ginger root, chillies and cumin seeds. Fry until the cumin seeds turn brown (they will darken in seconds).

3. Quickly add the hing and immediately follow with the cauliflower. Turn it about with a spoon, frying for 4-5 minutes or until slightly browned and partially cooked. Add the rice and dal and fry for about 1 minute.

4. Pour in the fresh peas, water and tumeric and bring to a full boil over high heat. Reduce the heat to low, partially cover and slowly cook, stirring occasionally, for 1- 1 1/2 hours or until rice and dal are soft and the mixture is similar to oatmeal in consistency. As the kichari thickens, stir frequently to prevent sticking. Before serving, add the salt and 1 tablespoon ghee.

Indian Vegetarian Halavah Recipe


emolina Halavah with golden raisins

Preparation and cooking time (after assembling ingredients): about 25 minutes
Serves: 6

2 cups water
3/4 cup sugar
1/3 cup golden raisins
1/2 cup ghee
1 cup semolina
1/4 cup sliced almonds

1. Combine the water and sugar in a heavy 2 quart saucepan over low heat and, while stirring, dissolve the sugar. Raise the heat and bring the mixture to a boil. Gently boil it for a few minutes. Add the raisins and set aside, covered.

2. Heat the ghee in a large saucepan over moderately low heat. When it is hot, add the semolina and rhythmically stir-fry until the grains swell and darken to a warm golden color, about 10 minutes. Remove the pan from the heat.

3. Stirring steadily, gradually pour syrup into the semolina. At first the grains may sputter, but will quickly cease as the liquid is absorbed. Place the pan over very low heat and, stirring steadily, cook until the grains absorb the liquid and the texture is fluffy, up to 10 minutes. Best if served hot or warm.

Indian Vegetarian Pakora Recipe


The preparation and cooking time after assembling ingerdients: about 10 minutes.
Resting time of the dough: 10 minutes
Cooking time: about 30 minutes

Batter:

1 1/3 cup chickpea flour (garbanzo bean flour)
3/4 teaspoon baking powder
1/2 teaspoons crushed chillies
3/4 teaspoons salt
1/2 teaspoon cinnamon
1 teaspoon ground cumin seeds
9 teaspoons cold water

Pakora suggestions
(you can use the vegetable of your choice):
Thin rounds of zucchinu
Small cauliflower flowerets
Potato rounds
Carrot rounds or strips
Thin-sliced eggplant wedges
Under-ripe banana, thinly sliced
Pumpkin, cut into squares
...Be creative

1. Sift the flour. Add spices and salt. Miw well. Add water slowly, beating with a whisk until batter is smooth. The batter should have the consistency of heavy cream.

2. Cover the batter and set aside for 10 minutes.

3. Whisk again for a couple of minutes and stir in the baking powder. Set aside.

4. Heat 3 inches of ghee or oil in a wok or pan until it is hot (355 F). Dip 5 or 6 of your selected ingredients in the dough and slip them one at a time in the hot ghee or oil. Fry until the pakoras are golden-brown, turning to brown evenly. Leavy greens may take as little as 1 minute per side, potaios may take up to five minutes per side. Remove with a slotted spoon. Serve hot.